

Add and Manage Network Devices in rConfig V8 Core
After reading this page, you can add devices to rConfig V8 Core through any of the supported methods, organise them with command groups, vendors, and tags, and use the device table and detail views to audit configuration backups.
How rConfig V8 Core organises devices
Section titled “How rConfig V8 Core organises devices”The device inventory is the single source of truth for your network in rConfig V8 Core. Devices move through a defined lifecycle and are organised across several dimensions, which is what makes filtering, reporting, and automation possible at scale.
The device lifecycle
Section titled “The device lifecycle”Every device follows the same path from onboarding to decommissioning:
- Onboarding: Define device credentials, connection parameters, and organisational attributes.
- Validation: Initial connection attempts verify accessibility and configuration.
- Active management: Regular configuration backups run on schedule.
- Maintenance: Update credentials, connection templates, or organisational assignments.
- Decommissioning: Remove the device gracefully while preserving the audit trail.
Organisational dimensions
Section titled “Organisational dimensions”Devices are organised across three dimensions at once:
- Command Groups: Functional grouping based on device role (Core Switches, Edge Routers, Firewalls).
- Vendors: Manufacturer-based organisation for template and command consistency.
- Tags: Flexible, multi-dimensional labelling for cross-cutting concerns (location, environment, criticality).
This multi-dimensional model lets you filter and report on devices in combinations such as “all Tier1-Critical devices in Production across the EMEA region”, while keeping access controls intact.
How do you add devices to rConfig?
Section titled “How do you add devices to rConfig?”You can add devices to rConfig V8 Core in five ways: manual entry for one or two devices, cloning an existing device, the REST API for programmatic onboarding, CSV import for bulk operations, and synchronisation from an integration. Each method suits a different scenario, from small deployments to enterprise-scale automation.
Manual device entry
Section titled “Manual device entry”Manual addition gives you complete control over individual device configuration. It suits:
- Initial system setup and testing
- Adding unique or specialised devices
- Situations requiring careful validation of each parameter
- Training and familiarisation with the device structure
When to use: Small-scale deployments (1 to 10 devices), proof-of-concept environments, or devices with unique configurations that do not fit bulk import patterns.
Process: Navigate to Devices, then Add Device, complete all required fields, and submit. rConfig validates credentials and starts an initial configuration download.
Clone existing devices
Section titled “Clone existing devices”Cloning accelerates onboarding by replicating configuration from a similar device. rConfig copies all attributes except device-specific fields (name and IP address), which makes it efficient for standardised deployments.
When to use: Adding multiple devices with identical or similar configurations, such as rolling out a new branch office with standard equipment, or adding switches in a stack.
What gets cloned:
- Connection template and credentials
- Command group assignment
- Vendor and model information
- Tag associations
- Port and prompt configurations
What requires manual entry: Device name, IP address, and any device-specific customisations.
Programmatic addition via REST API
Section titled “Programmatic addition via REST API”The REST API connects rConfig to external systems and automation workflows. You can use an existing CMDB, IPAM, or orchestration platform to populate the device inventory automatically.
When to use:
- Integration with existing IT service management tools
- Automated provisioning workflows
- Synchronisation with authoritative data sources
- Custom automation scripts and applications
Key capabilities:
- Bulk device creation with a single API call
- Real-time synchronisation with external systems
- Programmatic validation and error handling
- Integration with CI/CD pipelines for infrastructure-as-code workflows
For endpoint details, see the REST API reference.
Bulk import from CSV
Section titled “Bulk import from CSV”CSV import onboards large device populations from spreadsheets or database exports. Use it for initial migrations or periodic synchronisation with external inventory systems.
When to use:
- Migrating from legacy configuration management systems
- Initial population of the device inventory (50+ devices)
- Periodic updates from authoritative spreadsheet-based inventories
- Bulk updates to existing device attributes
Prerequisites:
- CSV file formatted to the rConfig schema
- Pre-configured command groups, vendors, and templates
- Valid credentials for device access
- Network connectivity to the target devices
The import process includes validation, duplicate detection, and detailed error reporting. For the full walkthrough, see the device add workbook.
Synchronisation from an integration
Section titled “Synchronisation from an integration”rConfig synchronises devices directly from several network management and inventory platforms, enabling automated device discovery and ongoing updates.
Supported sources include:
- Network monitoring and inventory exports
- IPAM and CMDB platforms
- Cloud inventory data
Benefits:
- A single source of truth maintained in the external system
- Automatic device updates as infrastructure changes
- Reduced manual data entry and synchronisation errors
- Consistent device attributes across management platforms
For setup steps, see the import guides for NetMRI, Oxidized, RANCID, and SolarWinds NCM.
Device prerequisites
Section titled “Device prerequisites”Before adding devices, establish the foundational elements that define how devices are organised, accessed, and managed. Planning these first significantly reduces administrative overhead and keeps device management consistent.
Required configuration elements
Section titled “Required configuration elements”| Element | Purpose | Relationship | Configuration priority |
|---|---|---|---|
| Command Groups | Functional device categorisation | One-to-one (device to group) | High, define first |
| Commands | Device interrogation instructions | Many-to-many (commands to groups) | High, define early |
| Connection Templates | Access method specification | One-to-one (device to template) | Critical, required |
| Vendors | Manufacturer organisation | One-to-one (device to vendor) | Medium, useful for filtering |
| Tags | Flexible multi-dimensional labelling | Many-to-many (devices to tags) | Low, can add later |
Command groups
Section titled “Command groups”Command Groups (formerly Categories) organise devices by functional role within your network. This structure determines which command sets run against which device types.
Design considerations:
- Align with network architecture layers (Core, Distribution, Access)
- Consider device functionality (Routing, Switching, Security, Wireless)
- Plan for future growth and device type expansion
- Balance granularity with management complexity
Example structure:
Core Infrastructure├── Core Routers├── Core Switches└── Data Center Fabric
Edge Infrastructure├── Branch Routers├── Access Switches└── Wireless Controllers
Security Infrastructure├── Firewalls├── VPN Concentrators└── IDS/IPS Devices
For detailed command group planning, see the Command Groups documentation.
Commands
Section titled “Commands”Commands define the configuration and operational data retrieved from devices. The command library should cover both configuration backup and operational visibility.
Essential command categories:
- Configuration commands: Full configuration backup (show running-config, show startup-config)
- Operational commands: Version, inventory, interface status, routing tables
- Security commands: Access lists, authentication configs, encryption status
- Diagnostic commands: Logging, error counters, environmental status
Each command associates with one or more Command Groups, enabling targeted execution by device type. For command creation and management, see the Commands documentation.
Vendors
Section titled “Vendors”Vendor designation provides manufacturer-based organisation and enables vendor-specific template and command optimisation. It is not strictly required to operate, but it significantly improves filtering, reporting, and automation.
Vendor management benefits:
- Template association by manufacturer platform
- Command syntax optimisation for vendor-specific CLI
- Bulk operations on manufacturer-specific device populations
- Licence and support tracking by vendor relationship
For vendor setup, see the Vendors documentation.
Connection templates
Section titled “Connection templates”Connection Templates define the authentication method, protocol, and connection parameters for device access. Templates are the most critical prerequisite. Devices cannot be added without an assigned template.
Template components:
- Protocol: SSH, Telnet, SNMP (v2c/v3)
- Authentication: Username/password, SSH keys, SNMP communities
- Connection parameters: Port numbers, timeout values, retry logic
- Privilege escalation: Enable password handling, privilege mode access
Most organisations maintain a small library of standard templates (SSH for Cisco IOS, SSH for Juniper Junos) with variations for different security zones or authentication requirements. For template configuration, see the Connection Templates documentation.
Tags provide flexible, cross-cutting categorisation that complements the hierarchical Command Group structure. Unlike Command Groups (one-to-one), a device can carry multiple tags, enabling multi-dimensional organisation.
Tag strategy examples:
- Geographic: Region-EMEA, Site-London, Building-HQ
- Environmental: Production, Staging, Development
- Criticality: Tier1-Critical, Tier2-Important, Tier3-Standard
- Lifecycle: Active, Maintenance, Decommissioned
- Compliance: PCI-DSS, HIPAA, SOX
Tag-based filtering and reporting enables operations such as “show all Tier1-Critical devices in Production across the EMEA region”. Plan your tag taxonomy carefully to maximise operational value. For tag setup, see the Tags documentation.
The device table and interface
Section titled “The device table and interface”The device table is the primary interface for inventory management, providing visibility and control over your entire device population.
Table features and capabilities
Section titled “Table features and capabilities”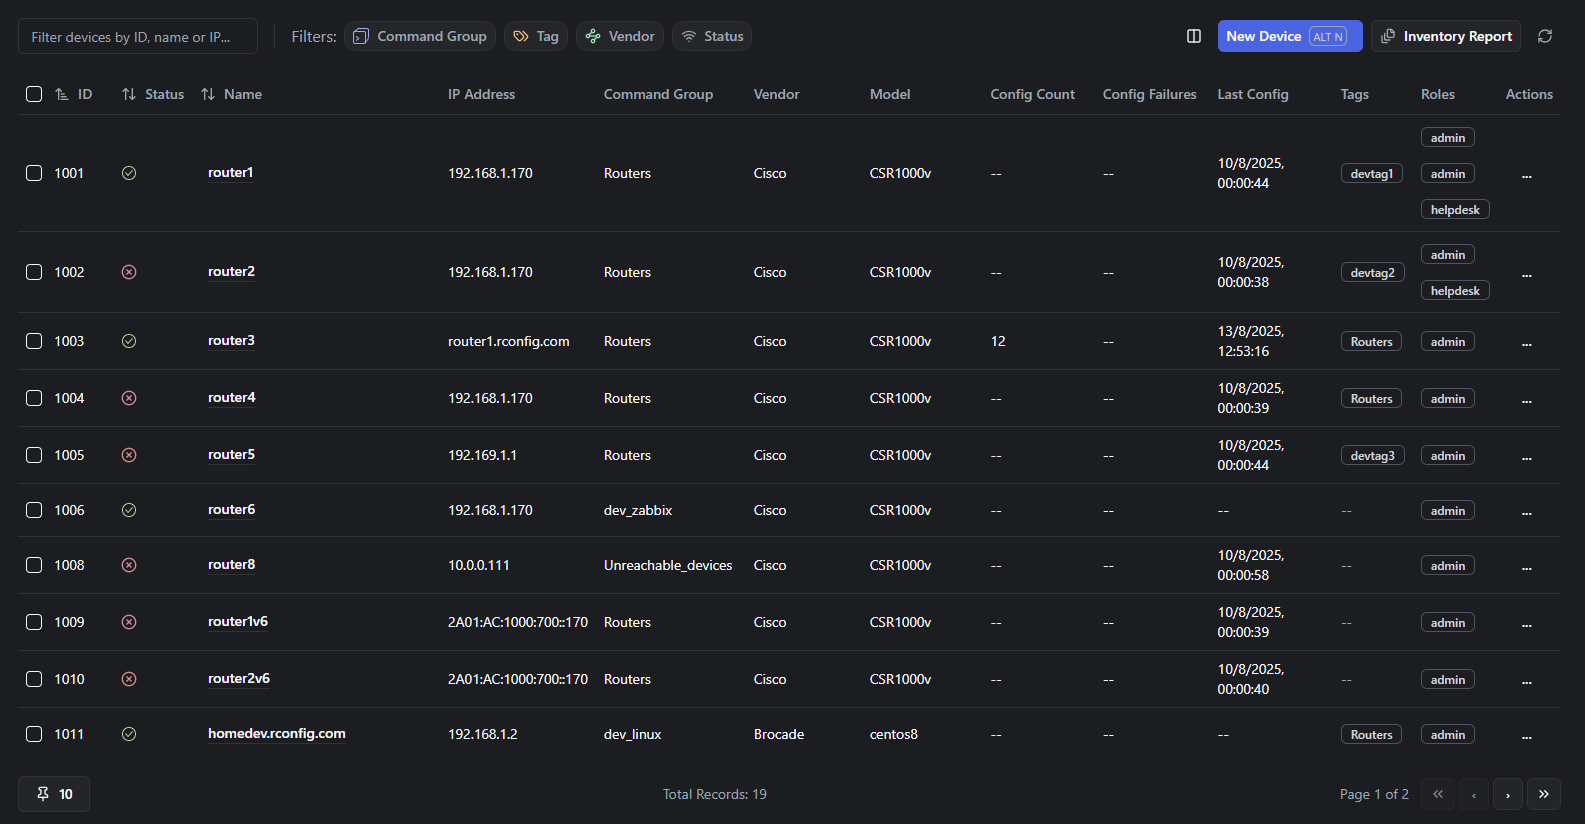
Search and filter capabilities:
- Global search: Locate devices by name, IP, model, or any visible attribute
- Column filters: Narrow results by vendor, command group, tag, or status
- Status filters: Show devices by operational state (up, down, disabled)
- Custom views: Save frequently used filter combinations for rapid access
Table management:
- Column customisation: Show or hide columns based on operational needs
- Pagination: Configurable page size (25/50/100/500 devices per page)
- Sorting: Multi-column sorting for organised device lists
- Bulk selection: Select multiple devices for batch operations
Device action menu
Section titled “Device action menu”Each device row gives immediate access to common management functions through the action dropdown menu.

| Action | Function | Use case |
|---|---|---|
| Edit | Modify device configuration | Update credentials, templates, or organisational attributes |
| Clone | Duplicate device settings | Rapidly add similar devices with pre-populated configuration |
| Disable | Suspend device operations | Temporarily exclude from scheduled jobs without deletion |
| Delete | Remove device permanently | Decommission devices (requires confirmation, preserves audit trail) |
Device main view
Section titled “Device main view”The device detail view provides visibility into individual device status, configuration history, and management capabilities.
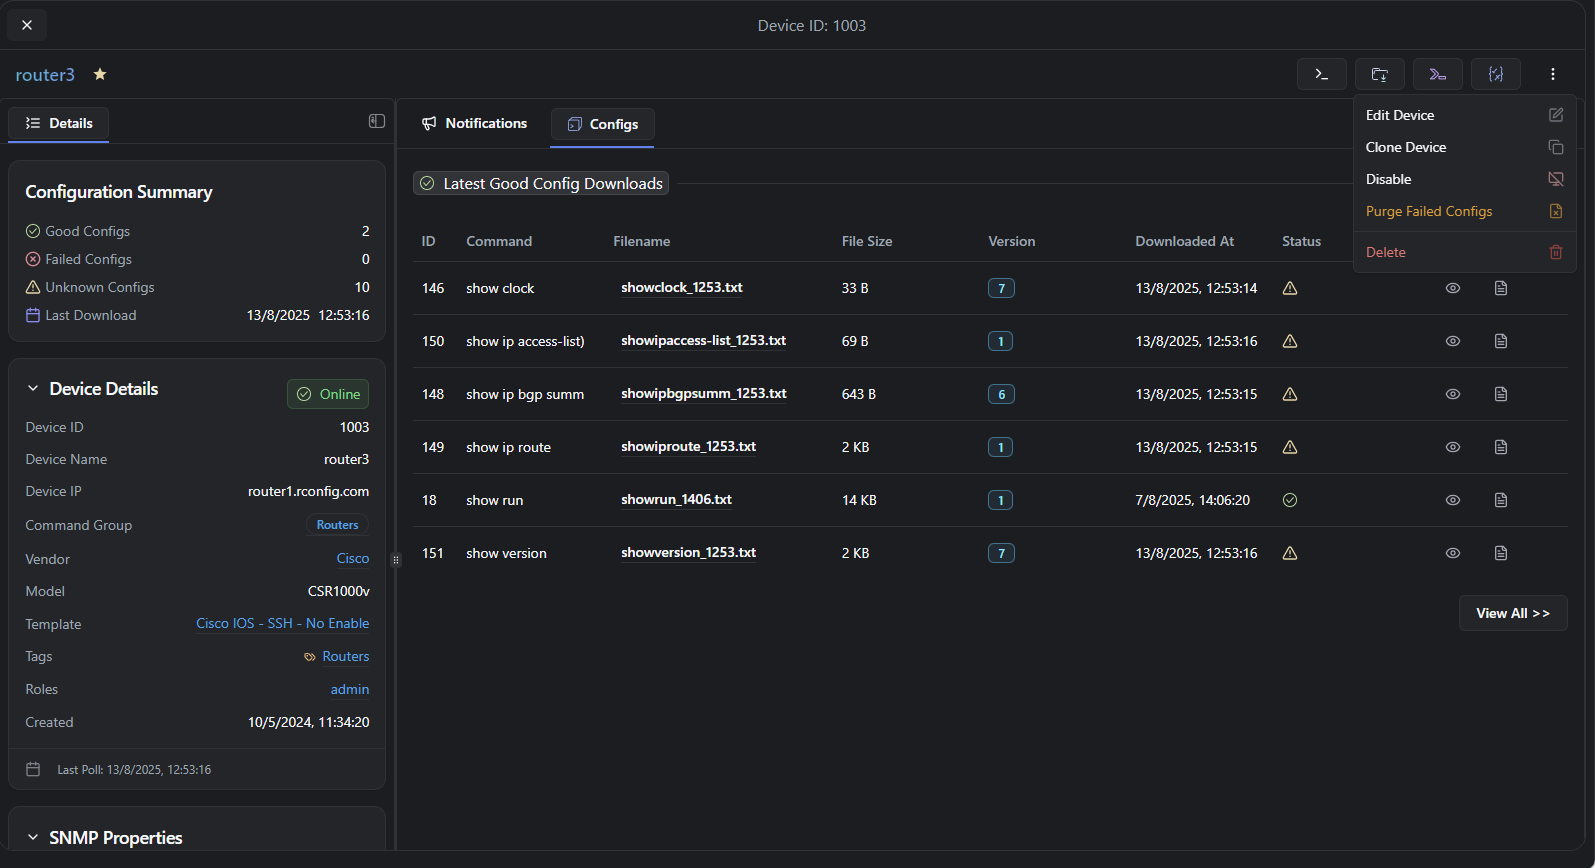
Key components:
- Configuration viewer: Access current and historical configurations with diff capabilities.
- Manual download: Run an immediate configuration backup outside scheduled jobs.
- Activity logs: View connection attempts, download history, and error conditions.
- Device cloning: Launch a clone operation pre-populated with current device settings.
- Debug tools: Copy the debug command to the clipboard for troubleshooting connection issues.
The main view supports common scenarios such as validating configuration changes, investigating backup failures, and performing ad-hoc configuration retrieval during maintenance windows.
Adding and editing devices
Section titled “Adding and editing devices”When to use this
Section titled “When to use this”Use this walkthrough when adding a single device by hand or editing an existing device’s settings, credentials, or prompts. For bulk onboarding, use CSV import or the REST API instead, both covered in the methods section above.
Prerequisites
Section titled “Prerequisites”- A configured connection template, since devices cannot be saved without one. See Connection Templates.
- At least one command group for the device. See Command Groups.
- Valid device credentials and confirmed network reachability from the rConfig server.
- Optionally, vendors and tags configured first if you want to assign them during creation.
Step-by-step device addition
Section titled “Step-by-step device addition”The video below walks through adding and editing a device end to end.
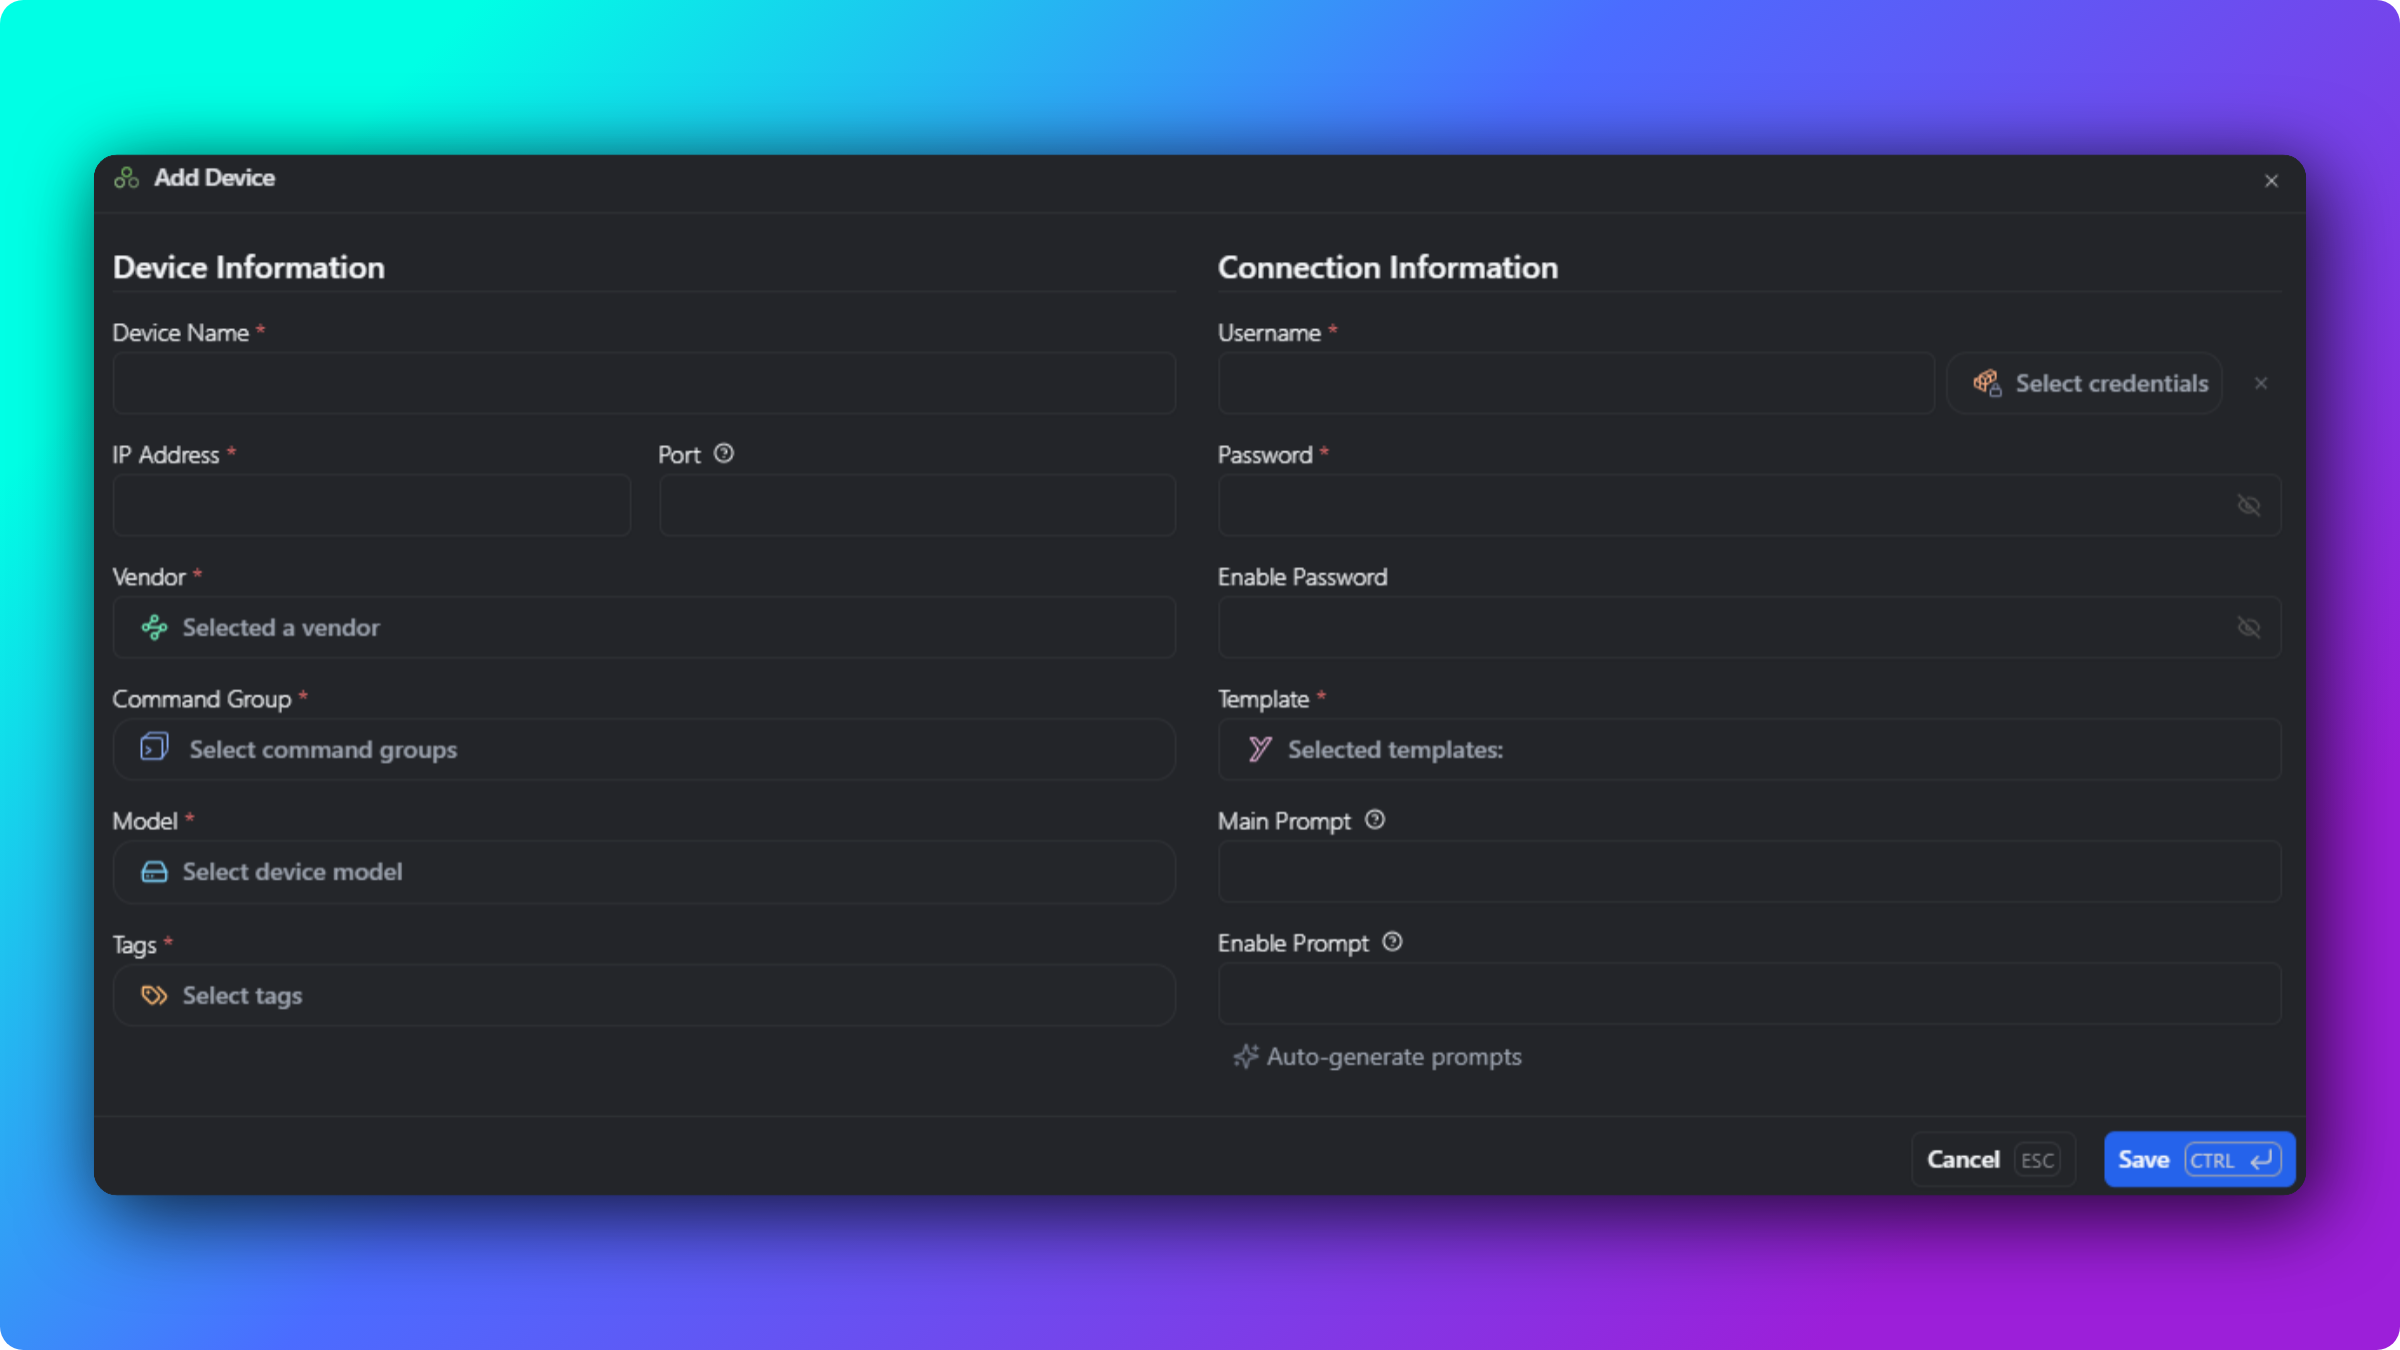
To add a device by hand:
- Navigate to Devices in the left sidebar.
- Click Add Device to open the device form.
- Enter the Device Name, following your naming convention (no spaces, minimum 3 characters).
- Enter the Device IP as a valid IPv4 or IPv6 address.
- Select the Vendor, Command Group, and Template from their dropdowns.
- Enter the Username and Password, or select a stored credential set to auto-populate them.
- Configure the Main Prompt and, if the device needs privilege mode, the Enable Prompt.
- Click Save to create the device and start the initial configuration download.
Device form field reference
Section titled “Device form field reference”Knowing each field’s purpose and validation requirements helps onboarding succeed and prevents common configuration errors.
Required fields
Section titled “Required fields”| Field | Format requirements | Notes and best practices |
|---|---|---|
| Device Name | Alphanumeric with underscores, dots, dashes. Minimum 3 characters. No spaces allowed. | Use a consistent naming convention (for example SITE-ROLE-NUMBER). Names should be unique and descriptive for easy identification in logs and reports. |
| Device IP | Valid IPv4 or IPv6 address | Verify reachability before adding the device. Use the management interface IP for best accessibility. |
| Vendor | Selection from configured vendors | Choose the manufacturer to enable vendor-specific optimisations and template associations. |
| Command Group | Selection from configured command groups | Determines which command sets run against this device. Must align with device capabilities. |
| Template | Selection from configured templates | Defines connection method, protocol, and authentication. Critical for successful device access. |
Optional fields
Section titled “Optional fields”| Field | Purpose | Configuration guidance |
|---|---|---|
| Device Port | Override the template default port | Specify when the device uses a non-standard port (for example SSH on 2222 instead of 22). Leave empty to use the template default. |
| Model | Device model designation | Select an existing model or enter a new string. Useful for inventory tracking and template refinement. |
| Tags | Multi-dimensional categorisation | Assign multiple tags for flexible filtering (location, environment, criticality). Plan the taxonomy for maximum operational value. |
Credential fields
Section titled “Credential fields”Credential management supports both manual entry and selection from stored credential sets. Large device populations benefit significantly from standardised credential sets.
| Field | Options | Security considerations |
|---|---|---|
| Username | Manual entry or dropdown selection | Selecting from the credential dropdown auto-populates the password fields. Credentials are encrypted at rest. |
| Password | Manual entry or auto-populated | Stored securely using AES-256 encryption. Consider shared credentials for a device role rather than unique per-device. |
| Enable Password | Optional for privilege escalation | Required only for devices needing enable mode (Cisco IOS and similar). Auto-populated when using the credential dropdown. |
Prompt configuration
Section titled “Prompt configuration”Device prompts let rConfig detect successful authentication and command completion. Accurate prompt configuration is critical for reliable device interaction.
| Prompt type | Configuration approach | Full example | Regex example |
|---|---|---|---|
| Main Prompt | Full specific prompt (preferred) or regex pattern | router01# | .*[>#] |
| Enable Prompt | Privilege mode prompt after escalation | router01# | .*# |
Prompt configuration strategies:
- Exact match (most reliable): Specify the complete prompt string including hostname.
- Partial match: Use regex for dynamic hostnames or standardised prompt formats.
- Wildcard patterns: Use when the prompt varies by mode or context.
For comprehensive prompt configuration and troubleshooting, see the Device Prompts documentation.
Verification steps
Section titled “Verification steps”After adding a device, run these checks to confirm proper configuration:
- Immediate download verification: Check the Queue Manager for successful job completion.
- Activity log review: Verify no authentication or connection errors in the device logs.
- Configuration validation: Open the device main view and confirm configuration retrieval.
- Scheduled job inclusion: Verify the device appears in the scheduled download job scope.
Why isn’t my device connecting?
Section titled “Why isn’t my device connecting?”Knowing the typical failure scenarios and their resolutions speeds up troubleshooting and reduces downtime during onboarding.
Authentication and connectivity issues
Section titled “Authentication and connectivity issues”Symptom: Device addition completes but the initial download job fails with authentication or timeout errors.
| Issue | Diagnostic steps | Resolution |
|---|---|---|
| Invalid credentials | Review activity logs for “Authentication failed” errors | Verify username and password; test credentials via a manual SSH/Telnet session |
| Network unreachability | Ping the device IP from the rConfig server, then check firewall rules | Verify connectivity; add the rConfig server IP to the device management ACLs |
| Incorrect port | Verify the service is listening on the expected port (netstat, telnet) | Update the device port field or template to match the actual service port |
| Prompt mismatch | Review logs for timeout during prompt detection | Correct the main/enable prompt fields to match the actual device prompt strings |
| Enable password required | Connection succeeds but privilege escalation fails | Add the enable password to the device configuration if privilege mode is required |
Debug workflow:
- Copy the debug command from the device main view.
- Run it on the rConfig server command line:
(Replace 1234 with the actual device ID.)
Terminal window cd /var/www/html/rconfigphp artisan rconfig:download-device 1234 -d - Review the connection trace for the specific failure point.
- Apply the appropriate resolution based on the failure stage (connection, authentication, privilege escalation, prompt detection).
Device form validation errors
Section titled “Device form validation errors”Symptom: Form submission fails with validation errors, or behaviour is unexpected after saving.
| Error message | Cause | Fix |
|---|---|---|
| ”Device name must be at least 3 characters” | Name too short | Provide a descriptive name meeting the minimum length |
| ”Device name contains invalid characters” | Spaces or special characters in name | Remove spaces; use only alphanumeric, dash, dot, underscore |
| ”IP address format invalid” | Malformed IP address | Verify valid IPv4 or IPv6 format |
| ”Template is required” | No connection template selected | Select an appropriate connection template for the device type |
| ”Command group is required” | No command group selected | Assign the device to an appropriate command group |
Form completion checklist:
Large-scale device management
Section titled “Large-scale device management”Symptom: The device table is slow to load, searches time out, or bulk operations fail with large inventories.
For deployments exceeding 5,000 devices, contact rConfig support for optimisation guidance.
Bulk operation best practices:
- Limit bulk imports to 500 devices per CSV file
- Schedule large imports during off-peak hours
- Use the API with rate limiting for continuous synchronisation
Performance benchmarks:
- Device table with 10,000 devices: under 2 second load time
- Global search across 10,000 devices: under 500ms response
- Bulk import of 500 devices: 2 to 5 minutes including validation
Advanced troubleshooting commands
Section titled “Advanced troubleshooting commands”For persistent issues that need deeper investigation, use these diagnostic commands:
# Navigate to the rConfig installation directorycd /var/www/html/rconfig
# Debug a specific device connection (replace 1234 with the device ID)php artisan rconfig:download-device 1234 -d
# Check queue worker status for job processing issuesphp artisan queue:work --once --verbose
# Review system logs for detailed error informationtail -f storage/logs/laravel.logCommon gotchas
Section titled “Common gotchas”Best practices for device management
Section titled “Best practices for device management”Organisational strategy
Section titled “Organisational strategy”Device naming conventions: Establish consistent naming that encodes critical information while staying unique:
- Include a site or location identifier
- Add the device role or function
- Append a sequence number or rack position
- Examples:
NYC-CORE-RTR-01,LON-ACCESS-SW-FL3-12,SFO-FW-DMZ-01
Credential management:
- Create role-based credential sets rather than per-device credentials
- Implement regular credential rotation schedules
- Use separate credentials for different security zones or compliance domains
- Maintain emergency “break-glass” credentials with strict audit requirements
Command group design:
- Align with network architecture layers and device functions
- Create granular groups for specialised device types
- Plan for expansion, avoiding overly broad or narrow categorisation
- Document each command group’s purpose and intended device types
Tag taxonomy:
- Design a multi-dimensional tag structure (geography, environment, criticality, function)
- Establish tag naming conventions to prevent proliferation
- Document tag meanings and appropriate usage
- Regularly audit tag assignments to prevent tag sprawl
Operational efficiency
Section titled “Operational efficiency”Bulk operations: Use bulk capabilities for efficiency at scale:
- Use CSV import for initial population or major inventory updates (50+ devices)
- Use API integration for continuous synchronisation with authoritative sources
- Use device cloning for rapid standardised deployments
- Use tag-based bulk operations (disable all devices with a specific tag)
Template standardisation: Maintain a focused template library:
- Create standard templates for common platform and protocol combinations
- Avoid template proliferation; combine similar templates when possible
- Document each template’s purpose and intended device types
- Version template changes and test against representative devices
Security considerations
Section titled “Security considerations”Credential security:
- Never store credentials in unencrypted external systems
- Use the credential dropdown to minimise credential exposure during device addition
- Rotate credentials in line with your security policy
- Audit credential usage through the activity logs
Network security:
- Restrict rConfig server access to management networks only
- Use firewall rules limiting rConfig to required device management protocols
- Use encrypted protocols (SSH) instead of plaintext (Telnet) wherever possible
- Isolate rConfig in a dedicated management VLAN with strict access controls
Scalability and performance
Section titled “Scalability and performance”Job queue optimisation: Keep job processing efficient for large device populations:
- Run multiple queue workers for parallel job processing
- Prioritise critical devices using queue priorities
- Monitor queue depth and worker performance metrics
- Scale queue workers based on volume (1 worker per 500 devices recommended)
API rate limiting: When using API integration for continuous synchronisation:
- Implement exponential backoff for retry logic
- Batch API calls to minimise overhead (50 to 100 devices per request)
- Schedule bulk synchronisation during off-peak hours
- Monitor API rate limits and adjust frequency accordingly
Quick reference
Section titled “Quick reference”Device addition methods comparison
Section titled “Device addition methods comparison”| Method | Best for | Scale | Complexity | Automation |
|---|---|---|---|---|
| Manual | Initial setup, unique devices | 1 to 10 devices | Low | None |
| Clone | Similar devices, standardised deployments | 10 to 50 devices | Low | Minimal |
| CSV Import | Bulk onboarding, migrations | 50 to 5,000 devices | Medium | Partial |
| Integration | Existing tool synchronisation | Unlimited | High | Full |
Device form field quick reference
Section titled “Device form field quick reference”| Field | Required | Format | Notes |
|---|---|---|---|
| Device Name | Yes | Alphanumeric, _, ., - (no spaces, min 3 chars) | Use a consistent naming convention |
| Device IP | Yes | Valid IPv4/IPv6 | Must be reachable from the rConfig server |
| Device Port | No | Numeric | Override the template port if needed |
| Vendor | Yes | Dropdown selection | For organisation and filtering |
| Command Group | Yes | Dropdown selection | Determines command execution |
| Model | No | Text or dropdown | Useful for inventory tracking |
| Tags | No | Multi-select | Enables flexible categorisation |
| Username | Yes | Text or credential dropdown | Credential dropdown auto-populates password |
| Password | Yes | Password or auto-populated | Encrypted at rest |
| Enable Password | No | Password or auto-populated | Required for privilege escalation |
| Template | Yes | Dropdown selection | Defines connection method |
| Main Prompt | Yes | Exact string or regex | Critical for connection success |
| Enable Prompt | No | Exact string or regex | For privilege mode detection |
What’s next
Section titled “What’s next”- Configure device prompts → to ensure reliable prompt detection and connection success.
- Set up connection templates → to define connection methods, protocols, and authentication.
- Bulk onboard with the device add workbook → to import large device populations from CSV.
For additional help, see the rConfig V8 Core documentation, ask the community on GitHub, or contact support@rconfig.com. Advanced deployment and architecture capabilities are part of the Pro, Enterprise, and Vector editions, documented separately at docs.rconfig.com.